
How to Connect AppRiver
To configure and connect the AppRiver integration, please select from the following:
Requirements
Important: AppRiver API authentication requires a two-step process: generating API keys and authenticating through the AppRiver console after selecting the Authenticate button.
For complete setup instructions, please refer to both How to Generate API Keys and Connect the Integration.
To connect with the AppRiver integration in Reconcile, you’ll need:
-
Client ID
- Client Secret
How to Generate API Keys
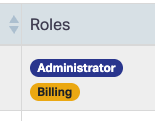
In addition to the Customer Portal Administrator permission, ensure the user also has the Billing role enabled. Without these roles, the user will not be able to create API credentials or access the Billing API.
To verify or update user roles:
-
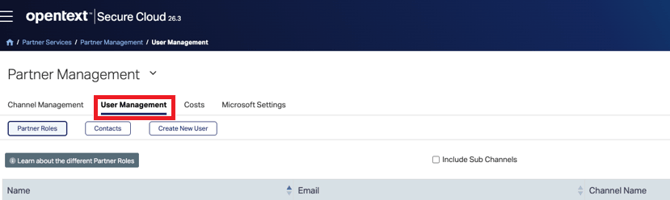
Navigate to Partner Services → Partner Manage → User Management
-
Locate the user and review their assigned roles
-
If the Billing role is not enabled, select Actions → Edit
- Enable Has Billing Role and save the changes
- Log in to your AppRiver Console using a Customer Portal Administrator account that has the Billing role(detailed above).
- In the left-hand navigation menu, navigate to Partner Services > Partner Integrations. Click the API credentials management tab.

- Click the Generate credentials button.
- If a Generate credentials button does not appear, you already have API credentials. If you do not know your credentials, you can regenerate your credentials.
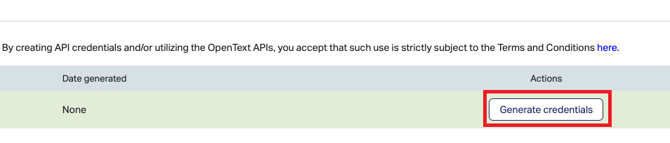
- If a Generate credentials button does not appear, you already have API credentials. If you do not know your credentials, you can regenerate your credentials.
- Be sure to store your credentials somewhere safe. You cannot view your credentials in Secure Cloud after you close this dialog box.
Connect the Integration
- Login to Gradient.
- Navigate to the Integrations tab.
- Select the AppRiver integration and click Connect.
- Enter the Client ID and Client Secret retrieved from the previous steps.
- Click Authenticate.
- You will be redirected to the AppRiver console. If you are not already signed in, sign in with your AppRiver account.
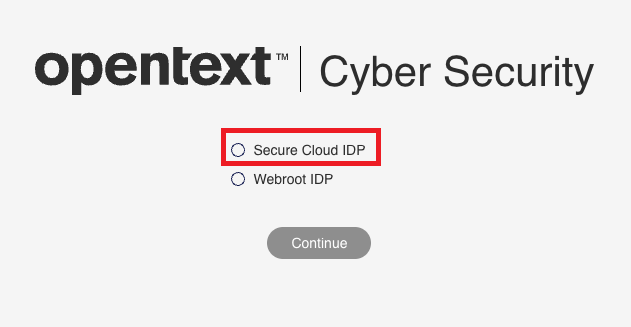
- Select Secure Cloud IDP, then click Continue.
- After authentication is successful, you will be redirected back to Gradient. Your accounts and services will begin generating, and the integration status will update to Pending.
- If you are unable to proceed to the next step, click the status refresh button or refresh your browser.
Map Accounts and Services
Note: If you need further details on account and service mapping, click here.
-
Map Accounts and Services
- When setting up the integration for the first time, accounts are automatically matched if there's an exact match between your vendor and PSA.
- For accounts not automatically matched:
- Use the filter button beside the account names on the right, or
- Use the search bar on the left to find PSA accounts.
- Drag and drop the PSA accounts from the left to match them with vendor accounts on the right.
-
Proceed to Service Mapping
- Once accounts are mapped, click "Next" to access the Service Mapping step.
- Align services or products from your PSA, displayed on the left, with the corresponding vendor services or SKUs on the right. For ConnectWise PSA users, search by Product ID.
- Ensure at least one account and one service mapping is completed to finish the configuration.
- After mapping the services, click "Next".
-
Finalize Configuration
- Review your service configurations and click "Finish" to complete the setup.
- This will initiate a sync. The "Sync Status" indicator at the top-right will start spinning, showing that a sync is in progress.
- Once the sync is complete, the "Refresh" button will light up pink, indicating the sync is complete. Click that button to see the vendor usage data populated.
- Use the filter or sort options to jump to the connected services and start reviewing and approving usage!