Overview
The integration with Auvik Network Management syncs billable devices from this platform and does not currently support Auvik SaaS Management. The following services are available to map and reconcile, based on your billing requirements:
- Total Billable Devices
- Firewalls
- Controllers
- Routers
- Layer 3 Switches
- VoIP Switches
- Switch Stacks
- Total Switches
- Access Points
How to Configure Auvik Network Management
To configure and connect the Auvik Network Management integration, please select from the following:
What Counts as a "Billable Device"
For further clarification on what counts as a billable device in Auvik Network Management, please consult the following article here.
How to Sync "Average Billable Devices"
The current integration focuses on "Total Billable Devices", online devices marked as managed and meeting Auvik's billable criteria. While there are minor disparities, we're actively improving alignment with Auvik's billing.
Your Auvik dashboard shows real-time data on currently billable online devices. Auvik typically bills MSPs monthly from the 1st to the end of the month, counting any device online during this period as a "billable day".
For more information, log in to your Auvik Network Management portal, go to Settings, and choose Billing.
Access Points
Although Access Points do not generally count as billable devices in Auvik Network Management, we have added this additional service to reconcile the number of access points deployed at each site to help with your billing.
Unmanaged Devices
In Auvik Network Management, there is an option to edit a device and change its status from "billable" to "unmanaged". However, please be aware that we do not currently synchronize "unmanaged" billable devices into Reconcile.
Additionally, Auvik Network Manager employs an "Auvik-identified" category rather than a "user-identified" one. There may be differences between Auvik's definition of a billable device and the user-identified fields, as well as the "managed" devices synchronized by Reconcile.
Authentication Details
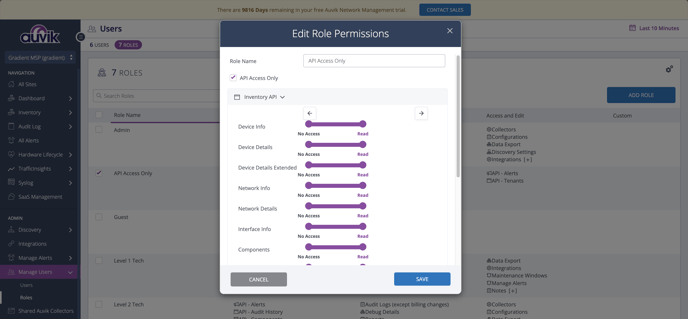
Check API Access Only Role Permissions
Before inviting an API Access Only user, make sure that the API Access Only role has the right permissions. Make sure that the role is set up with "API Access Only" enabled and "Read Access" granted for the "Inventory API".
- Login to Auvik Network Manager.
- Click on "Manage Users" in the side navigation bar, then select "Roles".
- Choose the "API Access Only" role and click on "Edit".
- Enable the "API Access Only" option.
- Expand the "Inventory API" section and ensure that "Read" access is selected.
- Click on "Save" to apply the changes.
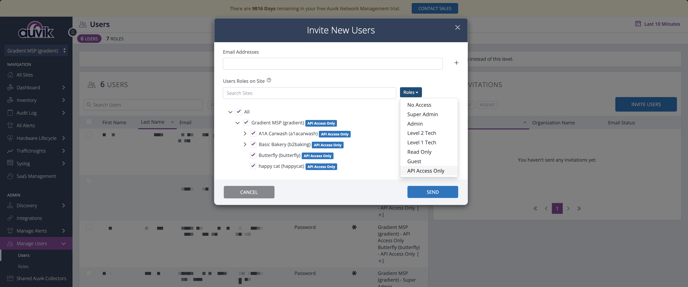
Invite User with API Access Only Role
Before generating an API Key, it's recommended that you invite a new user that has an API Access Only Role that has Read Only access to all accounts.
- Login to Auvik Network Manager.
-
Click on "Manage Users" in the side navigation bar, then select "Users".
-
In the Invitation box, select "Invite User".
-
Enter the email address you wish to invite (e.g., gradient@yourdomain.com). Note that access to this email inbox is required to accept the invitation, register, and log in as this user to generate an API Key.
-
Check the box for "All" sites from the list of sites.
-
From the "Roles" drop-down menu, choose "API Access Only."
-
Click on "Invite" to send the invitation.
- Accept the invitation, which finishes the registration process, and log in as this user to generate an API key according to the following steps below.
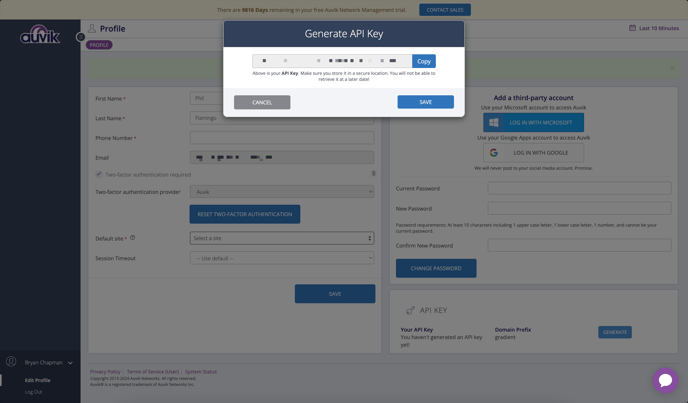
Generate an API Key
- Login to Auvik Network Manager
- Navigate to your User Profile in the side navigation bar.
- Click on "Generate".
- Copy the generated API key by clicking "Copy" and ensure to securely store this API Key for future use.
- Click "Save" to confirm the changes.
Note: generated keys may need to be regenerated in cases where the API Key has failed 3 authentication attempts.
API URL
In order to authenticate Auvik Network Management, an API URL is required. Within the API URL, "us1" (https://auvikapi.us1.my.auvik.com) should be changed to match the region in which your account resides. To locate the region, log into your Auvik dashboard and look at the URL in your browser’s address bar.
The API URL should follow this format: https://auvikapi.<region>.my.auvik.com
Connect Auvik Network Management
- Navigate to the Integrations tab.
- Select the Auvik Network Management integration and click Connect.
- Enter the API URL and API Key generated from Auvik Network Management in the previous steps.
- Click Authenticate.
- Once successfully authenticated, accounts and services will be synced, and the integration will update to pending status. You can click the status refresh button or simply refresh your browser if you are unable to proceed to the next step.
Map Accounts and Services
Note: If you need further details on account and service mapping, click here.
-
Map Accounts and Services
- When setting up the integration for the first time, accounts are automatically matched if there's an exact name match between your vendor and PSA.
- For accounts not automatically matched:
- Use the filter button beside the account names on the right, or
- Use the search bar on the left to find PSA accounts.
- Drag and drop the PSA accounts from the left to match them with vendor accounts on the right.
-
Proceed to Service Mapping
- Once accounts are mapped, click "Next" to access the Service Mapping step.
- Match services or products from your PSA, displayed on the left, with the corresponding vendor services or SKUs on the right. For ConnectWise PSA users, you can also search by Product ID.
- Ensure at least one account and one service mapping is completed to finish the configuration.
- After mapping the services, click "Next".
-
Finalize Configuration
- Review your mappings and click "Finish" to complete the setup.
- This will start a sync. The "Sync Status" indicator at the top-right will start spinning, showing that a sync is in progress.
- Once the sync is complete, the "Refresh" button will light up pink, indicating the sync is complete. Click that button to see the vendor data filled out.
- Use the filter or sort options to jump to the connected services and start reviewing and reconciling!
Top