In just a few steps, you can import Vendor Usage Reports.
Upgrade to pro, then Drag and drop your File directly into the Reconcile™ billing module, map your data and begin reconciling!
Create a Vendor Import Mapping Profile
- Configure an Import Profile
- Confirm Header Row & Columns
- Map Accounts
- Map Services
- Confirm Import
- Reconcile
Once you reconcile a service card for the month, it will not reappear. If you do a second import, only cards with new values will display.
Once you have set up your import with Reconcile, we will remember your previous settings allowing you to upload the latest Import File and reconcile the changes monthly.
Before uploading your vendor usage each month, it is recommended to perform a PSA Sync. This will ensure that your PSA usage is accurate.
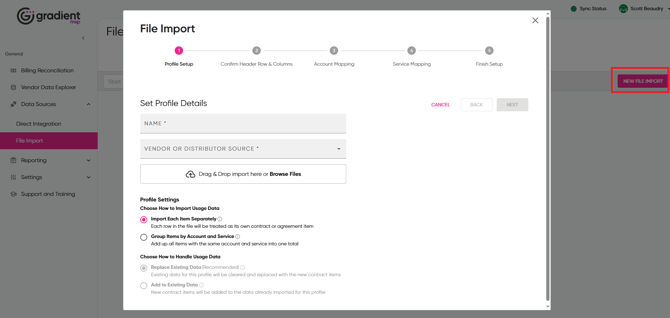
Step 1: Configure an Import Profile
- From your dashboard, select Data Sources > File Import.

- On the imports page, you will see your existing import profiles, and can create a new profile by selecting the New File Import button
- Drag and drop an Import File into the import tool - or click on the tool to load the file explorer.
- Give your new import a Name.
- Select the vendor or distributor associated with the Import. If the vendor you're uploading does not exist, contact Support to add them.
- Choose whether you would like each line of the Import added to Gradient separately, or if you would like lines that have the same account and service aggregated into a single line in Gradient.
- Press Next
Aggregate service quantities: If selected, the import tool will Aggregate (sum) the unit counts for the Invoice Items that share the same SKU and update the total quantity in Gradient to this sum.
New Imports: When adding a new Import to an existing profile, you also have the option of clearing all old data off your dashboard and starting fresh, or simply adding the new data to any existing data already on your dashboard.
File sizes are limited to 5MB. Please contact support if you require a larger import.
Step 2: Confirm Header Row & Columns
Keep the pre-selected header row, or select a new row of your choosing
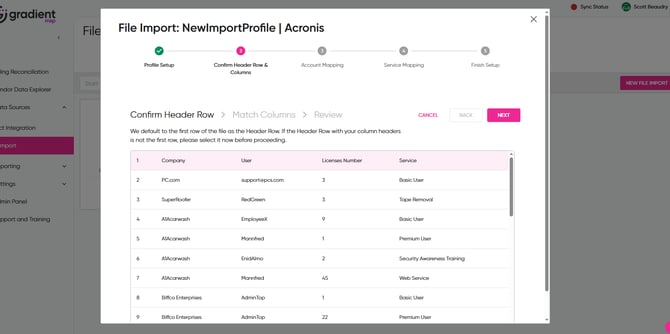
Review the Imported data. If there are any errors in the CSV, they will show up here. In practice, the only errors that generally arise are when we detect a count of "0" for one or more lines. We cannot import 0 values, and so they are removed from the import when we upload it. Note this means they will not appear on your Gradient dashboard.

Press Next to proceed to Account Mapping. Account and Service mapping are done the exact same way they are in normal integrations.
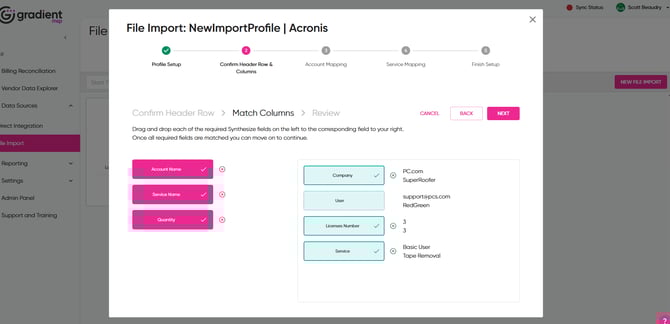
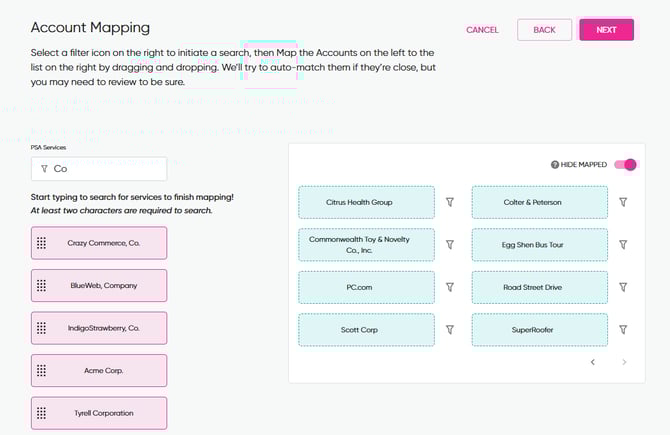
Step 3: Map Accounts
- Drag and drop the PSA accounts from the left to the import file on the right.
- You will notice we auto-matched any accounts that are exact. You can easily find and match the remaining accounts by using the filter bar or clicking the filter icon to the right of the card.
- Once you have mapped all accounts, press Next.
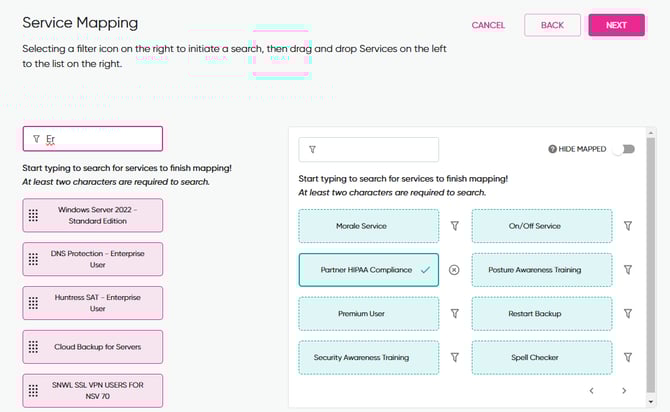
Step 4: Map Services
- Drag and drop your service(s) on the left to the import file list on the right. You can easily find and match the remaining accounts by using the filter bar or clicking the filter icon to the right of the card.
- Once you have mapped all the services, press Next.
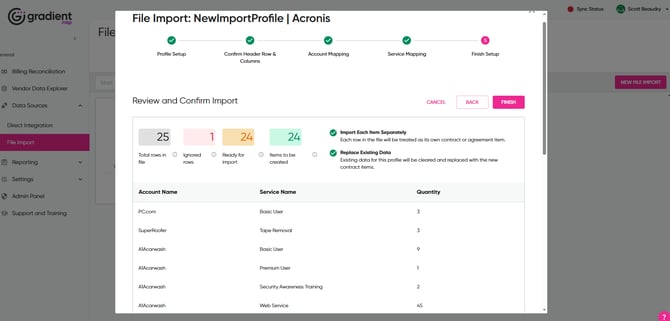
Step 5: Confirm Import
- We will display the Accounts, Services, and Quantities to be imported. Once you have reviewed them, press Finish.
- Your import will process over the next 2-5 minutes, and you will be returned to the billing module page.
NOTE: Currently, Syncs are only run for the counts from Imports when that Import is uploaded.
If mappings are changed outside of the Import wizard(such as in Advanced Config), you will need to re-upload the import file through the main Import wizard before the changes made in Advanced Config will be represented on your dashboard.
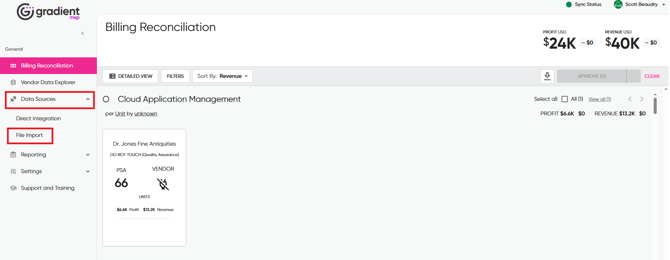
Step 6: Reconciliation
- Scroll down to find the vendor with imported quantities, or select the filter option and search by Vendor/Distributer tag.
- Reconcile like a flock star! We would recommend that you go ahead and expand the section to review all cards. Cards can be actioned in either view.
- Reconcile!

Service cards/Line Items function exactly like they do with a regular integration, and you can Add, Approve, Dismiss, and check the Details of them just like any other card.