Billing Reconciliation Best Practices
- When to Reconcile
- Steps before Reconciliation
- Clear your Unmapped Count First
- List View and Group By
- Filter by Vendor
- Bulk Approve and Dismiss
- Bulk Effective Date
- Spot Check Before you Bulk Approve
- Working in a Monthly Rhythm
When to Reconcile
Reconcile works best for partners who bill in advance. Any approved changes default to the first of the following month, so logging in during the last few days of the month and invoicing on the first is the natural rhythm.
If you currently bill in arrears, you're not out of luck. You can bulk approve changes for a specific date using the Set Effective Date option, so you can still reconcile your usage quickly.
TopSteps before Reconciliation
Sync your PSA and your vendor integrations before opening the reconciliation dashboard. Working with stale data leads to service cards that reflect yesterday's reality, not today's.
- Run a full PSA sync from Settings > Data Settings > PSA Configuration > Start Full Sync. Wait for it to complete.
- From the Sync Status screen, run Quick Sync All to refresh your vendor integrations.
When to use QuickSync vs Full Sync: QuickSync pulls only what has changed since the last sync and is the default for monthly reconciliation. Full Sync is only necessary when you've made large PSA changes (renamed many customers, changed statuses) or reconnected an integration. See our separate article on QuickSync vs Full Sync for details.
Clear Your Unmapped Count First
Before you touch a single service card, open Data Sources > Advanced Config and check that your unmapped count on both the Accounts and Services tabs is zero. Any unmapped items could mean you'll be working with incomplete data on your dashboard.
Common reasons accounts or services drift to unmapped between reconciliations:
- A new customer was added to a vendor portal and hasn't been linked to your PSA yet.
- A customer or service was renamed on either side, breaking the existing map.
- A new product appeared in a vendor catalogue and needs a map or exclude decision.
Make it step one: Clearing unmapped items should be the very first thing you do each month. It takes five minutes and it means every card you see on the dashboard afterwards is correct.
List View Group by Functionality
After your syncs are complete, switch to List View and use Group By to organise the dashboard:
- Group by Account when you want to review one customer at a time, especially for your largest clients.
- Group by Service when you want to reconcile a single product across all customers (for example, Microsoft 365 Business Premium).
- Group by Contract when you're working through renewals or agreement-level changes.
This gives you a quick read on how your month went and where the changes are concentrated.
Filter by Vendor
If you want to focus on how a specific vendor performed this month, or if you want to reconcile each vendor individually, click the Filters dropdown and select a Vendor or Distributor. The dashboard will only show results for that vendor, letting you reconcile them quickly and move on.
Bulk Approval / Dismissal
After you connect a vendor integration or import a CSV usage file, you can quickly approve multiple service cards at once.
Here’s how to Bulk Select:
- In Card View: Hover over a service card and click the pink checkmark in the top right corner.
- In List View: Check the box on the far left of each item to select multiple cards.
Before You Bulk Approve:
- Spot-check each service card to catch any issues.
- The first time you bulk approve or dismiss, a warning message will pop up.
- If you don’t want to see this warning again, you can choose to dismiss it.
Bulk Effective Date
When selecting cards, you can select the drop-down arrow next to Approve and choose to Set the Effective date.

When you select Set Effective Date, it will become the selectable button. ![]()
Select the button, and a modal will appear for you to choose the date for the changes to take effect.
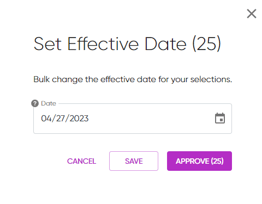
You can set the bulk effective date and save it without approving it if you are not ready to process it right away.
Proration requires PSA support: Set Effective Date will only produce a prorated transaction if your PSA supports proration and the specific agreement has proration enabled. See How to Prorate Transactions for PSA-specific details.
Spot Check Before You Bulk Approve
Bulk approve is one of the biggest time-savers in Gradient. It's also the fastest way to push bad data if something upstream is wrong.
Before you bulk approve, take a minute to:
- Scroll through the selected cards and look for any quantity change that seems out of proportion (e.g., a small customer suddenly showing a +50 change).
- Check any New Revenue cards separately. These almost always benefit from individual review since they represent billing opportunities.
- If you see anything that doesn't look right, deselect it from the bulk action and handle it individually.
Working in a Monthly Rhythm
Once you've been through a reconciliation cycle or two, the process becomes predictable. A working pattern that most partners settle into:
- Days 1 to 25 of the month: Day-to-day PSA work continues normally. Gradient syncs happen automatically in the background.
- Day 25 to 28: Open Gradient, clear any unmapped items, run fresh syncs.
- Day 28 to 30: Work through the reconciliation dashboard, approve or dismiss cards, handle any New Revenue.
- First of the next month: Generate invoices.
For a detailed walkthrough of the full workflow, see our separate article Monthly Reconciliation Workflow.
Top