Don't be confined to just simple metrics! You have complex billing scenarios, so what's stopping you from automating billing reconciliation using super awesome, complex custom metrics? Here are a few examples to get inspired, take wing, and truly experience the ROARING power of our Liongard integration.
Hit that fuchsia button to jump straight to the use-case scenario!
 |
 |
 |
Note If you haven't done so already, please review the Liongard Requirements.
Scenario 1 – Custom Metrics for Per User Services
Do you happen to have a number of per-user services or service bundles that you wish to automatically reconcile? You've come to the right place. We can evaluate Metrics within Liongard to automatically pull usage from Inspectors' Data Print (raw data) and return those values back to Synthesize billing module, for you to review and reconcile your services, instantly writing back and updating your PSAs contract line items.
Creating a basic Metric
- Let's get started by creating a new custom Metric in Liongard (Admin > Metrics > Add Metric).
- Choose Azure Active Directory from the Inspector dropdown menu.
- Give the Metric a name and prefix it with 'Gradient' (for example, 'Gradient - Azure Active Directory: Total User Count'). Note, that the prefix is required, as this is currently the only way to filter custom Metrics in Synthesize billing module.
- Select a Child Inspector from the Choose a System dropdown menu.
- For this scenario, we are going to start by creating a basic Metric to evaluate the number of users. To start, we will begin by entering this basic JMESPath query in the Data Print Query:
Users[]
Note, the square brackets indicate an array of objects and JMESPath is case sensitive.
This is a great start, but as you can see from the screen capture below, the query results will retrieve all information within each object in the array. For us to successfully map Services to Metrics in Gradient Billable™, all we require is an integer. Now that we've cleared that up, let's move on to the next step.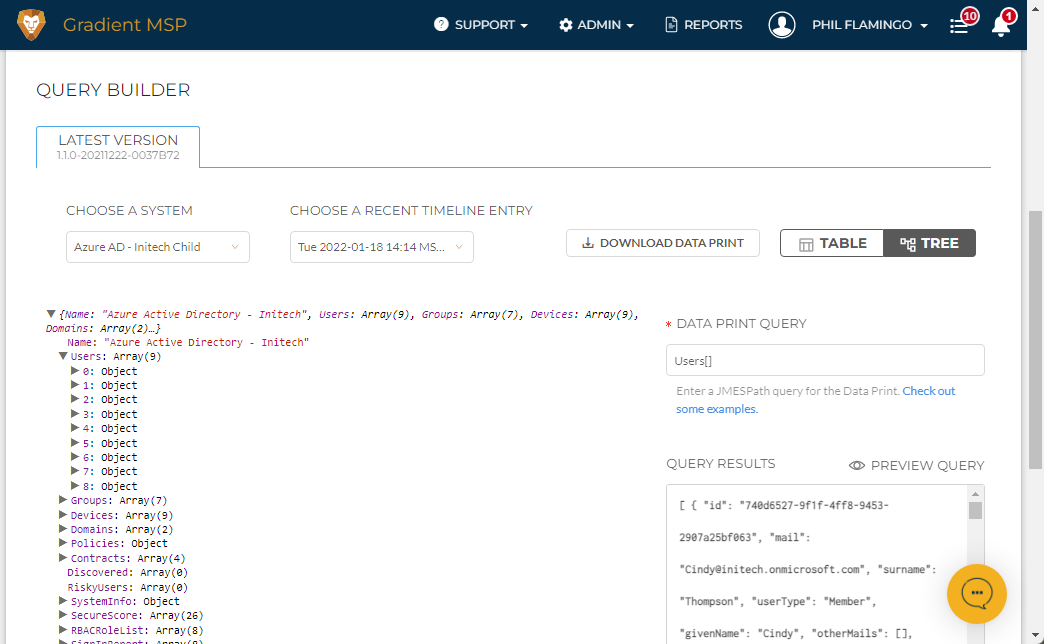
- Let's now begin to filter this data even further by adding in a filter within the Users array for 'accountEnabled'. Enter the following query:
Users[?accountEnabled == !false]
The following query pulls Users where assignedLicenses is not equal to 'false'. Now we're getting somewhere, but we haven't quite aggregated the query results into an integer. We used the not-expression "!" in this example.not-expression = "!" expression
- Now, let's add the function evaluation length. Length function returns the length of the given argument. There are two ways to evaluate a query with a function, either at the end of the query, or before:
Users[?accountEnabled == !false] | length(@)
length(Users[?accountEnabled == !false])
- Now, the query results are evaluating into a whole number, for us to then map services to this new per-user Metric within Synthesize billing module.
- Not sure how to map custom metrics to a service in Synthesize billing module? Click here.
Tip For more information on JMESPath, click here.
Advanced filtering
- Before we save the new custom Metric, let's go ahead and add additional filters. This is truly the ROARING power of the Liongard to come up with advanced Metrics to reconcile single or multiple services!
- Let's go ahead and add another filter, to further define our source of truth for this particular per-user service. Start by adding an AND expression to your query.
and-expression = &&
We added the following not_null function to the query to filter all users that mail is not null. If you wanted to evaluate the opposite, you could simply add the not-expression = "!" expression before the not_null function.
?not_null(mail, '')
Once we add in the and-expression, the query will look something like this:
Users[?not_null(mail, '') && accountEnabled == !false] | length(@)
- Go ahead and add the query above in the Data Print Query, and you should have an evaluated number for a Child Inspector (System) for the Azure Active Directory inspector type, evaluating all users' accounts that are enabled and contain 'initech' in their email address.
- Remember, don't be confined to just simple metrics. Be creative and find your source of truth from various inspector types and queries. Now, it's time for you to take wing, and truly experience the ROARING power of the Liongard integration. Spread your wings, and reconcile away!
- Not sure how to map custom metrics to a service in Synthesize billing module? Click here.
Tip For more information on JMESPath improved filters, click here.
Note For the full list of System Inspector Types Liongard offers, click here.
Scenario 2 – Custom Metrics for Per Device Services
Creating a basic Metric
- Let's get started by creating a new custom Metric in Liongard (Admin > Metrics > Create Metric).
- Choose Datto RMM from the Inspector dropdown menu.
- Give the Metric a name and prefix it with 'Gradient' (for example, 'Gradient - Azure Active Directory: Total User Count'). Note that the prefix is required, as this is currently the only way to filter custom Metrics in Gradient Billable™.
- Select a Child Inspector from the Choose a System dropdown menu.
- For this scenario, we are going to start by creating a basic Metric to evaluate the number of users. To start we will begin by entering this basic JMESPath query in the Data Print Query:
Devices[]
- Let's now begin to filter this data even further by adding a filter within the Devices array for 'lastSeen_r', and adding the comparison operator >=, less than or equal to. Enter the following query:
Devices[?lastSeen_r <= '60']
This query now evaluates all devices that have last been seen less than or equal to 60 days from now. This is a great start, but the query results are still a string array. We need this evaluation to be a whole number for us to use in Synthesize billing module.
- Now, add the length function, returning the length of the given argument.
Devices[?lastSeen_r <= '60'] | length(@)
length(Devices[?lastSeen_r <= '60'])
- Now, the query results are evaluated into a whole number for us to then map services to this new per-user Metric within Synthesize billing module.
Tip For more information on JMESPath, click here.
Advanced filtering
- Now, let's go ahead and further define our source of truth for this use case. In this example, perhaps instead of total devices, we want to filter down further to just server counts. This way, we can leverage this Metric to map to per-server services or service bundles in Synthesize billing module.
-
To further filter down to device type, we can add another filter to the query by adding in the and-expression = &&, like the following:
Devices[?deviceType.category == 'Server' && lastSeen_r <= '60'] | length(@)
- Go ahead and add the query above in the Data Print Query, and you should have an evaluated number for a Child Inspector (System) for the Datto RMM inspector type, evaluating all devices within the array by device type server, and have last been seen less than or equal to 60 days from now.
- Remember, don't be confined to just simple metrics. Be creative and find your source of truth from various inspector types and queries. Now, it's time for you to take wing and truly experience the ROARING power of the Liongard integration. Spread your wings, and reconcile away!
Tip For more information on JMESPath improved filters, click here.
Note For the full list of System Inspector Types Liongard offers, click here.